fbpx

Setting Up a Custom Tracking Domain in SendMails.io

Tracking your emails is crucial for understanding your audience’s behavior and improving your email marketing campaigns. With SendMails.io, you can set up a custom tracking domain to monitor your email opens and clicks. This guide will walk you through the process step by step.

Why Use a Custom Tracking Domain? #

  • Enhanced Deliverability: Using your own domain for tracking can boost your email deliverability rates.
  • Branding: Maintain consistent branding by using your own domain instead of a third-party one.
  • Detailed Insights: Gain insights into email opens, clicks, and other metrics.

Setting Up Your Custom Tracking Domain #

Method 1: DNS/CNAME Verification #

Notice: This method is recommended for most users as it is universally compatible with all hosting providers.

  1. Access SendMails.io:
    • Log into your SendMails.io account.
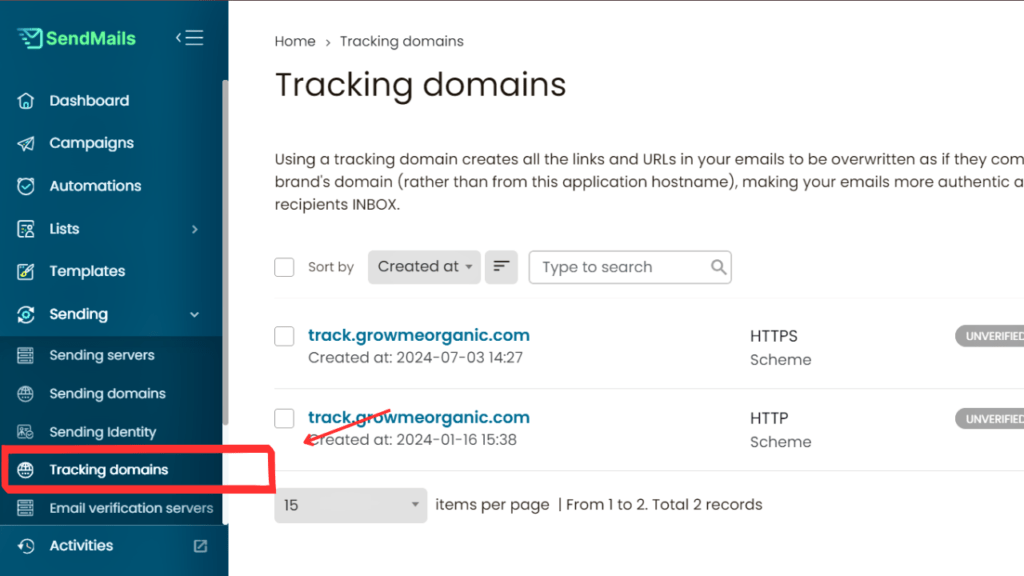
    • Navigate to the ‘Sendings’ tab and select ‘Tracking’s Domain’.
  2. Add Domain:
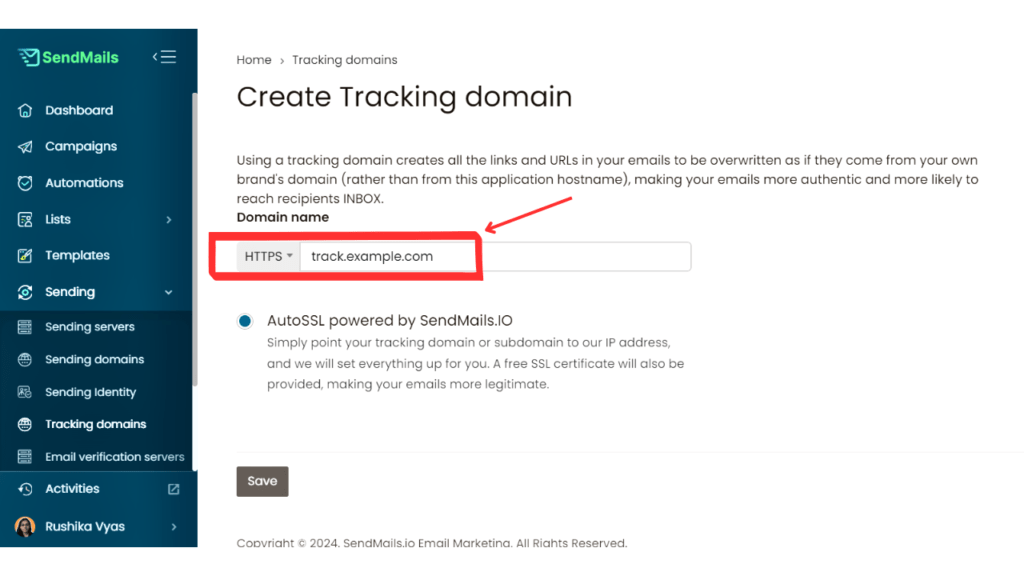
    • Click on ‘Add Domain’.
    • Enter your subdomain (e.g., track.yourdomain.com). Important: Only add a sub-domain, not your primary domain, as it can break your site.
    • Select the HTTP method when adding the subdomain.
  3. DNS Record Creation:
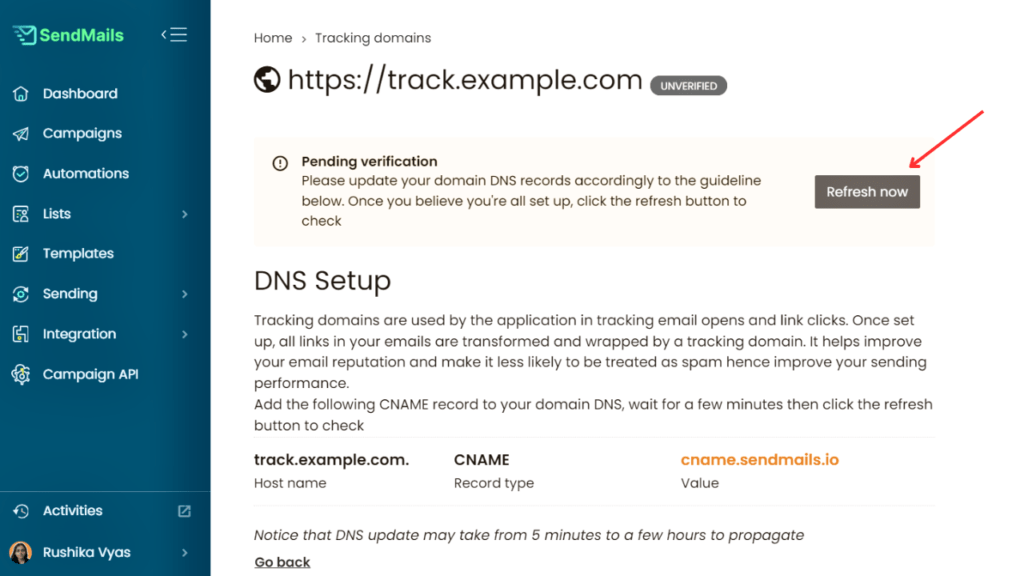
    • Copy the provided CNAME record from SendMails.io.
    • Access your domain provider’s DNS Zone Editor (e.g., GoDaddy, Hostinger).
    • Create a new CNAME record and paste the copied value.
    • Save the changes. Note: DNS propagation can take up to 48 hours.
  4. Verification:
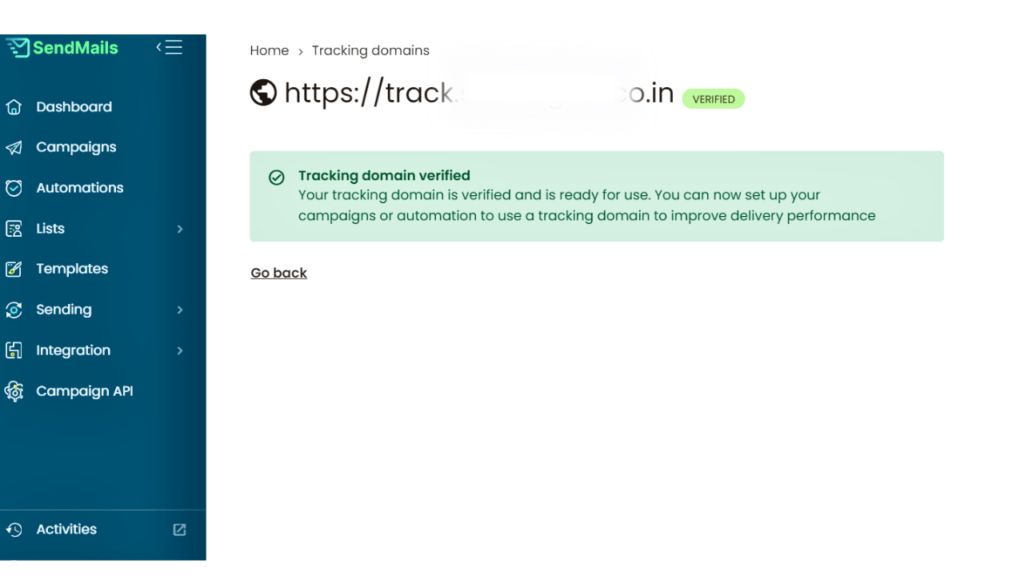
    • Return to SendMails.io and refresh the page.
    • Your tracking domain should now display as ‘Verified’.

Note: When using the DNS/CNAME verification method, only HTTP is recommended.

Method 2: Host Redirect Verification (For PHP Servers) #

Disclaimer: This method requires a PHP server, making it ideal for WordPress users. Ensure you follow the steps carefully to avoid potential issues.

  1. Choose Verification Method:
    • In SendMails.io, under ‘Tracking’s Domain’, select ‘Host Redirect Verification’.
  2. Add Subdomain:
    • Enter a new subdomain (e.g., tracking.yourdomain.com). Remember to only use a sub-domain.
    • Select the HTTPS method when adding the subdomain.
  3. Download Script:
    • Click on ‘View’ next to your added domain.
    • Download the provided tracking script.
  4. Upload Script to Server:
    • Access your hosting provider’s file manager.
    • Navigate to the folder associated with your subdomain. Important: The files are supposed to be uploaded in your sub-domain and not your primary domain.
    • Upload and extract the downloaded script.
  5. Test & Verify:
    • Visit your subdomain in a browser. You should see a message indicating the tracking domain is ready.
    • In SendMails.io, test the tracking domain. If successful, it will display as ‘Verified’.

Note: When using the script upload method, you can use both HTTP and HTTPS.

Wrapping Up #

Setting up a custom tracking domain in SendMails.io is straightforward. Whether you choose DNS/CNAME verification or host redirect verification, the process ensures you have a reliable way to track your email campaigns. If you encounter any challenges, don’t hesitate to reach out for assistance. Happy tracking!

Powered by BetterDocs

SENDMAILS.IO SIGN UP

Get Started for Free!

Sign up in seconds and unlock powerful email marketing features
Create a FREE Account
No Credit Card Required | Get Instant Access

SendMails.io Limited Time Offer

Special Early-Bird Offer (Lifetime Deal)

Take advantage of our exclusive limited-time offer and secure an additional lifetime discount as an early-bird
Coupon Code